Thymeleaf 是一款用于渲染 XML/XHTML/HTML5 内容的模板引擎。它与 JSP,Velocity,FreeMaker 等模板引擎类似,也可以轻易地与 Spring MVC 等 Web 框架集成。与其它模板引擎相比,Thymeleaf 最大的特点是,即使不启动 Web 应用,也可以直接在浏览器中打开并正确显示模板页面 。
Thymeleaf 是新一代 Java 模板引擎,与 Velocity、FreeMarker 等传统 Java 模板引擎不同,Thymeleaf 支持 HTML 原型,其文件后缀为“.html”,因此它可以直接被浏览器打开,此时浏览器会忽略未定义的 Thymeleaf 标签属性,展示 thymeleaf 模板的静态页面效果;当通过 Web 应用程序访问时,Thymeleaf 会动态地替换掉静态内容,使页面动态显示。
Thymeleaf 通过在 html 标签中,增加额外属性来达到“模板+数据”的展示方式,示例代码如下。
<!DOCTYPE html>
<html lang="en" xmlns:th="http://www.thymeleaf.org">
<head>
    <meta charset="UTF-8">
    <title>Title</title>
</head>
<body>
<!--th:text 为 Thymeleaf 属性,用于在展示文本-->
<h1 th:text="迎您来到Thymeleaf">欢迎您访问静态页面 HTML</h1>
</body>
</html>
当直接使用浏览器打开时,浏览器展示结果如下。
欢迎您访问静态页面HTML
当通过 Web 应用程序访问时,浏览器展示结果如下。
迎您来到Thymeleaf
在使用 Thymeleaf 之前,首先要在页面的 html 标签中声明名称空间,示例代码如下。
xmlns:th="http://www.thymeleaf.org"
Thymeleaf 作为一种模板引擎,它拥有自己的语法规则。Thymeleaf 语法分为以下 2 类:
Thymeleaf 模板引擎支持多种表达式:
使用 ${} 包裹的表达式被称为变量表达式,该表达式具有以下功能:
使用变量表达式可以获取对象的属性和方法,例如,获取 person 对象的 lastName 属性,表达式形式如下:
${person.lastName}
② 使用内置的基本对象
使用变量表达式还可以使用内置基本对象,获取内置对象的属性,调用内置对象的方法。 Thymeleaf 中常用的内置基本对象如下:
例如,我们通过以下 2 种形式,都可以获取到 session 对象中的 map 属性:
${#session.getAttribute('map')}
${session.map}
③ 使用内置的工具对象
除了能使用内置的基本对象外,变量表达式还可以使用一些内置的工具对象。
例如,我们可以使用内置工具对象 strings 的 equals 方法,来判断字符串与对象的某个属性是否相等,代码如下。
${#strings.equals('编程帮',name)}
选择变量表达式与变量表达式功能基本一致,只是在变量表达式的基础上增加了与 th:object 的配合使用。当使用 th:object 存储一个对象后,我们可以在其后代中使用选择变量表达式(*{...})获取该对象中的属性,其中,“*”即代表该对象。
<div th:object="${session.user}" >
    <p th:text="*{fisrtName}">firstname</p>
</div>
不管是静态资源的引用,还是 form 表单的请求,凡是链接都可以用链接表达式 (@{...})。
链接表达式的形式结构如下:
例如使用链接表达式引入 css 样式表,代码如下。
<link href="asserts/css/signin.css" th:href="@{/asserts/css/signin.css}" rel="stylesheet">
消息表达式一般用于国际化的场景。结构如下。
th:text="#{msg}"
注意:此处了解即可,我们会在后面的章节中详细介绍。
片段引用表达式用于在模板页面中引用其他的模板片段,该表达式支持以下 2 中语法结构:
以上语法结构说明如下:
Thymeleaf 还提供了大量的 th 属性,这些属性可以直接在 HTML 标签中使用,其中常用 th 属性及其示例如下表。
| 属性 | 描述 | 示例 |
|---|---|---|
| th:id | 替换 HTML 的 id 属性 |
<input id="html-id" th:id="thymeleaf-id" /> |
| th:text | 文本替换,转义特殊字符 |
<h1 th:text="hello,bianchengbang" >hello</h1> |
| th:utext | 文本替换,不转义特殊字符 |
<div th:utext="'<h1>欢迎来到编程帮!</h1>'" >欢迎你</div> |
| th:object |
在父标签选择对象,子标签使用 *{…} 选择表达式选取值。 没有选择对象,那子标签使用选择表达式和 ${…} 变量表达式是一样的效果。 同时即使选择了对象,子标签仍然可以使用变量表达式。 |
<div th:object="${session.user}" >
    <p th:text="*{fisrtName}">firstname</p>
</div>
|
| th:value | 替换 value 属性 |
<input th:value = "${user.name}" />
|
| th:with | 局部变量赋值运算 |
<div th:with="isEvens = ${prodStat.count}%2 == 0" th:text="${isEvens}"></div>
|
| th:style | 设置样式 |
<div th:style="'color:#F00; font-weight:bold'">编程帮 www.lmcjl.com</div> |
| th:onclick | 点击事件 |
<td th:onclick = "'getInfo()'"></td> |
| th:each |
遍历,支持 Iterable、Map、数组等。 |
<table>
    <tr th:each="m:${session.map}">
        <td th:text="${m.getKey()}"></td>
        <td th:text="${m.getValue()}"></td>
    </tr>
</table>
|
| th:if | 根据条件判断是否需要展示此标签 |
<a th:if ="${userId == collect.userId}">
|
| th:unless | 和 th:if 判断相反,满足条件时不显示 |
<div th:unless="${m.getKey()=='name'}" ></div>
|
| th:switch |
与 Java 的 switch case语句类似 通常与 th:case 配合使用,根据不同的条件展示不同的内容 |
<div th:switch="${name}">
    <span th:case="a">编程帮</span>
    <span th:case="b">www.lmcjl.com</span>
</div>
|
| th:fragment | 模板布局,类似 JSP 的 tag,用来定义一段被引用或包含的模板片段 |
<footer th:fragment="footer">插入的内容</footer> |
| th:insert |
布局标签; 将使用 th:fragment 属性指定的模板片段(包含标签)插入到当前标签中。 |
<div th:insert="commons/bar::footer"></div> |
| th:replace |
布局标签; 使用 th:fragment 属性指定的模板片段(包含标签)替换当前整个标签。 |
<div th:replace="commons/bar::footer"></div> |
| th:selected | select 选择框选中 |
<select>
    <option>---</option>
    <option th:selected="${name=='a'}">
        编程帮
    </option>
    <option th:selected="${name=='b'}">
        www.lmcjl.com
    </option>
</select>
|
| th:src | 替换 HTML 中的 src 属性 |
<img th:src="@{/asserts/img/bootstrap-solid.svg}" src="asserts/img/bootstrap-solid.svg" />
|
| th:inline |
内联属性; 该属性有 text、none、javascript 三种取值, 在 <script> 标签中使用时,js 代码中可以获取到后台传递页面的对象。 |
<script type="text/javascript" th:inline="javascript">
    var name = /*[[${name}]]*/ 'bianchengbang';
    alert(name)
</script>
|
| th:action | 替换表单提交地址 |
<form th:action="@{/user/login}" th:method="post"></form>
|
<div th:fragment="fragment-name" id="fragment-id">
    <span>公共页面片段</span>
</div>
<!--th:insert 片段名引入-->
<div th:insert="commons::fragment-name"></div>
<!--th:insert id 选择器引入-->
<div th:insert="commons::#fragment-id"></div>
------------------------------------------------
<!--th:replace 片段名引入-->
<div th:replace="commons::fragment-name"></div>
<!--th:replace id 选择器引入-->
<div th:replace="commons::#fragment-id"></div>
------------------------------------------------
<!--th:include 片段名引入-->
<div th:include="commons::fragment-name"></div>
<!--th:include id 选择器引入-->
<div th:include="commons::#fragment-id"></div>
<!--th:insert 片段名引入-->
<div>
    <div id="fragment-id">
        <span>公共页面片段</span>
    </div>
</div>
<!--th:insert id 选择器引入-->
<div>
    <div id="fragment-id">
        <span>公共页面片段</span>
    </div>
</div>
------------------------------------------------
<!--th:replace 片段名引入-->
<div id="fragment-id">
    <span>公共页面片段</span>
</div>
<!--th:replace id 选择器引入-->
<div id="fragment-id">
    <span>公共页面片段</span>
</div>
------------------------------------------------
<!--th:include 片段名引入-->
<div>
    <span>公共页面片段</span>
</div>
<!--th:include id 选择器引入-->
<div>
    <span>公共页面片段</span>
</div>
<!--th:insert 片段名引入-->
<div th:insert="commons::fragment-name(var1='insert-name',var2='insert-name2')"></div>
<!--th:insert id 选择器引入-->
<div th:insert="commons::#fragment-id(var1='insert-id',var2='insert-id2')"></div>
------------------------------------------------
<!--th:replace 片段名引入-->
<div th:replace="commons::fragment-name(var1='replace-name',var2='replace-name2')"></div>
<!--th:replace id 选择器引入-->
<div th:replace="commons::#fragment-id(var1='replace-id',var2='replace-id2')"></div>
------------------------------------------------
<!--th:include 片段名引入-->
<div th:include="commons::fragment-name(var1='include-name',var2='include-name2')"></div>
<!--th:include id 选择器引入-->
<div th:include="commons::#fragment-id(var1='include-id',var2='include-id2')"></div>
<!--使用 var1 和 var2 声明传入的参数,并在该片段中直接使用这些参数 -->
<div th:fragment="fragment-name(var1,var2)" id="fragment-id">
    <p th:text="'参数1:'+${var1} + '-------------------参数2:' + ${var2}">...</p>
</div>

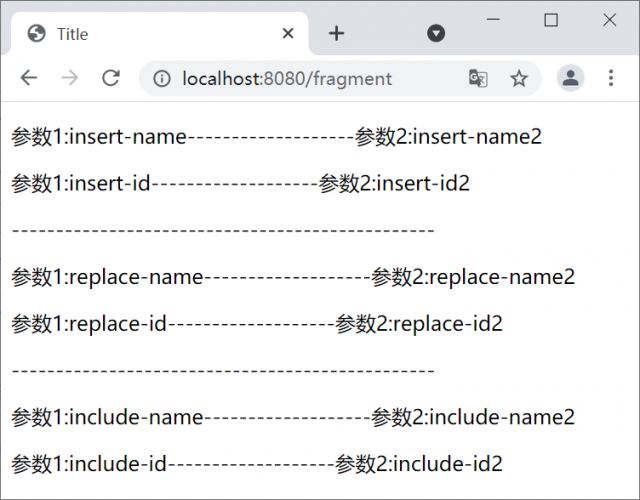
图1:参数传递效果图
本文链接:http://task.lmcjl.com/news/17022.html