pip3 install matplotlib
安装成功后,我们可以使用下面的引包方式,将其导入:from matplotlib import pyplot as plt
import numpy as np
from matplotlib import pyplot as plt
x = np.arange(1,11)
y = 2 * x + 5
#绘制坐标标题
plt.title("Matplotlib demo")
#绘制x、y轴备注
plt.xlabel("x axis")
plt.ylabel("y axis")
plt.plot(x,y)
plt.show()
输出结果如下:
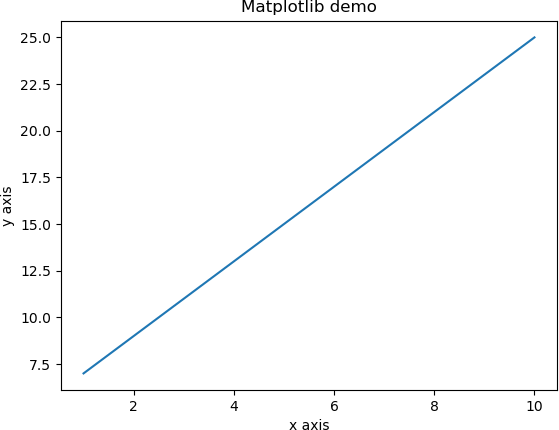
图1:Matplotlib绘制线性图
| 字符 | 描述 |
|---|---|
| '-' | 实线样式 |
| '--' | 短横线样式 |
| '-.' | 点划线样式 |
| ':' | 虚线样式 |
| '.' | 点标记 |
| ',' | 像素标记 |
| 'o' | 圆标记 |
| 'v' | 倒三角标记 |
| '^' | 正三角标记 |
| '<' | 左三角标记 |
| '>' | 右三角标记 |
| '1' | 下箭头标记 |
| '2' | 上箭头标记 |
| '3' | 左箭头标记 |
| '4' | 右箭头标记 |
| 's' | 正方形标记 |
| 'p' | 五边形标记 |
| '*' | 星形标记 |
| 'h' | 六边形标记 1 |
| 'H' | 六边形标记 2 |
| '+' | 加号标记 |
| 'x' | X 标记 |
| 'D' | 菱形标记 |
| 'd' | 窄菱形标记 |
| '|' | 竖直线标记 |
| '_' | 水平线标记 |
| 字符 | 颜色 |
|---|---|
| 'b' | 蓝色 |
| 'g' | 绿色 |
| 'r' | 红色 |
| 'c' | 青色 |
| 'm' | 品红色 |
| 'y' | 黄色 |
| 'k' | 黑色 |
| 'w' | 白色 |
import numpy as np
from matplotlib import pyplot as plt
x = np.arange(1,11)
y = 2 * x + 5
plt.title("Matplotlib demo1")
plt.xlabel("x axis")
plt.ylabel("y axis")
plt.plot(x,y,"ob")
plt.show()
输出结果如下图:
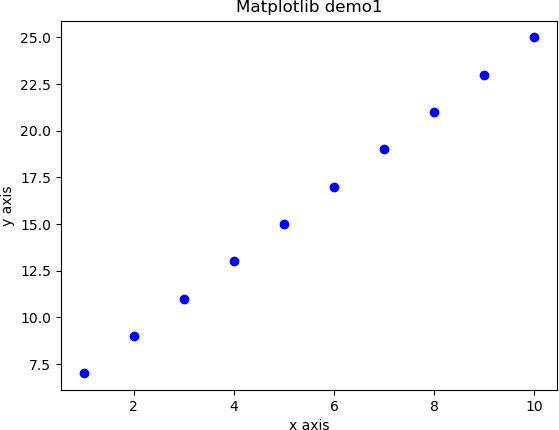
图2:Matplotlib绘制圆点图
import numpy as np
import matplotlib.pyplot as plt
# 计算正弦曲线上的x和y坐标
x = np.arange(0, 3 * np.pi, 0.1)
y = np.sin(x)
plt.title("sine wave image")
# 使用matplotlib制图
plt.plot(x, y)
plt.show()
输出结果:
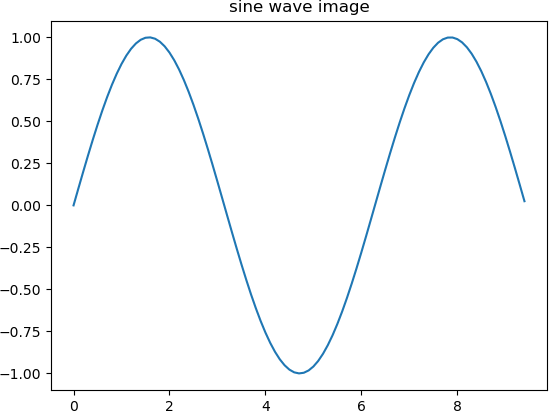
图3:Matplotlib绘图正弦图
plt.subplot(nrows, ncols, index, **kwargs)
参数说明:该函数使用三个整数描述子图的位置信息,这三个整数是行数、列数和索引值(此处索引值从1开始),子图将分布在设定的索引位置上。从右上角增加到右下角。比如,plt.subplot(2, 3, 5) 表示子图位于 2 行 3 列 中的第 5 个位置上。
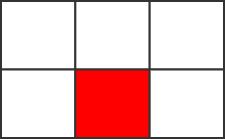
图4:subplot画布分割
import numpy as np
import matplotlib.pyplot as plt

#计算正弦和余弦曲线上的点的 x 和 y 坐标
x = np.arange(0, 3 * np.pi, 0.1)
y_sin = np.sin(x)
y_cos = np.cos(x)

#绘制subplot 网格为2行1列
#激活第一个 subplot
plt.subplot(2, 1, 1)
#绘制第一个图像
plt.plot(x, y_sin)
plt.title('Sine')

#将第二个 subplot 激活,并绘制第二个图像
plt.subplot(2, 1, 2)
plt.plot(x, y_cos)
plt.title('Cosine')
#展示图像
plt.show()
输出结果如下:
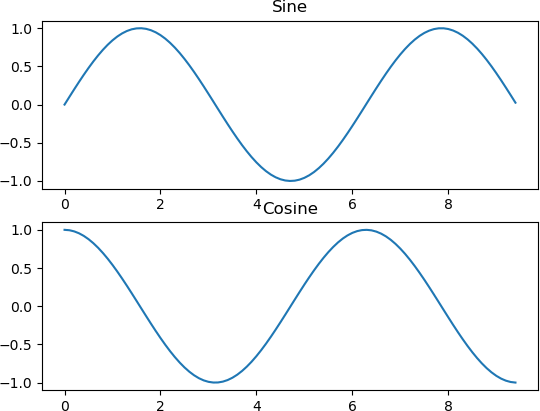
图5:Matplotlib绘制波形图
from matplotlib import pyplot as plt
#第一组数据
x1 = [5,8,10]
y1 = [12,16,6]
#第二组数据
x2 = [6,9,11]
y2 = [6,15,7]
plt.bar(x1, y1, align = 'center')
plt.bar(x2, y2, color = 'g', align = 'center')
plt.title('Bar graph')
#设置x轴与y轴刻度
plt.ylabel('Y axis')
plt.xlabel('X axis')
plt.show()
输出结果:
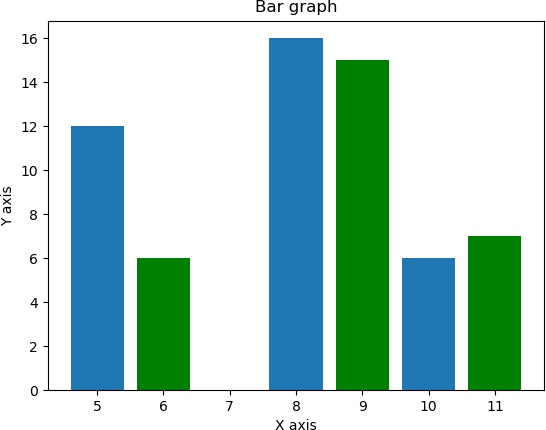
图6:Matplotlib绘制柱状图
histogram(array,bins=10,range=None,weights=None,density=False)
示例如下:import numpy as np a = np.arange(8) hist, bin_edges = np.histogram(a, density=True)输出结果如下:
his:
[0.17857143 0.17857143 0.17857143 0.         0.17857143 0.17857143
 0.         0.17857143 0.17857143 0.17857143]
bin_edges
[0.  0.7 1.4 2.1 2.8 3.5 4.2 4.9 5.6 6.3 7. ]
numpy.histogram() 将输入数组 a 和 bins 作为两个参数,其中 bins 数组的连续元素作为 bin 区间的边界值。示例如下:
import numpy as np
a = np.array([22,87,5,43,56,73,55,54,11,20,51,5,79,31,27])
np.histogram(a,bins = [0,20,40,60,80,100])
hist,bins = np.histogram(a,bins = [0,20,40,60,80,100])
print(hist)
print(bins)
输出结果如下:
返回hist直方图值:
[3 4 5 2 1]
返回bin区间边缘值:
[0 20 40 60 80 100]
from matplotlib import pyplot as plt
import numpy as np
a = np.array([22,87,5,43,56,73,55,54,11,20,51,5,79,31,27])
plt.hist(a, bins =  [0,20,40,60,80,100])
plt.title("histogram")
plt.show()
输出图像如下所示:
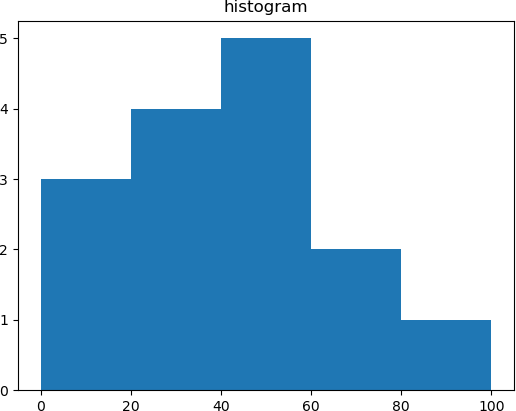
图7:Matplotlib直方图
本文链接:http://task.lmcjl.com/news/13701.html